Building a Background Removal Tool with Laravel and TransformersPHP
- Introduction
- What is TransformersPHP?
- Prerequisites
- Getting Started with TransformersPHP
- Implementing Background Removal
- Bringing it all together with Laravel
- Image Processing and Memory Limit
- Real-Time Updates with Laravel Reverb
- Adding an Image Comparator
- Optimizing for Page Refreshes
- Adding a Download Button
- Conclusion
Introduction
I posted a tweet about a background removal tool that I built using Laravel and TransformersPHP and the response was quite positive. So, I decided to write a step by step guide on how to build your own background removal tool using Laravel and TransformersPHP.
Now if you haven't heard about TransformersPHP, let me give you a quick overview.
What is TransformersPHP?
TransformersPHP is a powerful yet easy to use PHP library that allows PHP developers to run thousands of state of the art pre-trained machine learning models natively in PHP - no API, no external servers, minial setup, and considerably fast. The greatest collection/hub for open source pretrained models is obviously Hugging Face, and TransformersPHP is built to leverage models from Hugging Face. You can read more about it in the official documentation.
Now in this tutorial, we'll be using an open source model from HuggingFace - BRIA Background Removal v1.4 to build our background removal tool.
Prerequisites
-
PHP 8.1
-
Composer
-
FFI extension - FFI stands for Foreign Function Interface and it allows PHP to call functions in shared C libraries without the need for compilation. This opens up doors of opportunuties to perform tasks in PHP that previously were thought to be impossible or impractical. Installing extension in PHP is work I don't neccesarily like, but fortunately for us, FFI is bundled in most PHP installations from PHP 7.4 and above.
To check if the FFI extenstion is installed, you can run the following command:
php -m | grep FFIIf you see something like
FFIin the output, then you're good. There's one more thing to adjust in yourphp.inithough:ffi.enable = trueBy default, this is set to
preloadin most installations, and while this setting will work for using TransformersPHP from PHP CLI, it won't work for PHP-FPM based setups like those used in Laravel, and TransformersPHP doesn't support FFI preloading yet. -
JIT Compilation (optional) - Yeah, a lot of tests have shown that it makes no huge difference in web apps, but in this case, we'll be crunching a lot of numbers, so it's a good idea to have it enabled. However, it's not a hard requirement and your application can still run pretty fast without it.
Getting Started with TransformersPHP
Before we go to the laravel side of things, let's face the TransformersPHP side of things, and understand what is it that we need to do, then we'll see how it all fits into Laravel. For this part, let's use a vanilla PHP project with Composer.
Create a new directory for our project and navigate into it:
mkdir background-removal-tool && cd background-removal-toolInitialize a new Composer project:
composer initInstall TransformersPHP:
composer require codewithkyrian/transformersYou will receive a prompt to allow the transformers-libsloader plugin to run some code. Go ahead and approve it. This will download the required shared libraries. It's important you run the composer require command on the target platform where the code will be executed as the libraries are platform specific (I'm talking to y'all that use Docker or WSL).
Implementing Background Removal
If you've gone through the documentation, then you're familiar with the concept of pipelines. In TransformersPHP, a pipeline is a high level abstraction that groups models and tasks together. However, in this case, we'll not be using a pipeline, but the model class directly.
Create a new file named background-removal.php and add the following code:
background-removal.php
<?php use Codewithkyrian\Transformers\Models\Auto\AutoModel;use Codewithkyrian\Transformers\Processors\AutoProcessor; require 'vendor/autoload.php'; $model = AutoModel::fromPretrained(modelNameOrPath: 'briaai/RMBG-1.4');$processor = AutoProcessor::fromPretrained(modelNameOrPath: 'briaai/RMBG-1.4');Now let's take brief moment to understand what's happening here.
We're loading a pre-trained model and a pre-trained processor. The processor is responsible for preprocessing the image and the model is responsible for performing the background removal. There are many Auto* classes in TransformersPHP that automatically infer the model and processor to use based on the model name or path eg. AutoModelForAudioClassification, AutoModelForObjectDetection, etc. Also, if the model is officially supported in TransformersPHP, then you can directly use the model class eg. BertForSequenceClassification, RobertaForTokenClassification, etc. Our model is not officially supported, so we're using the AutoModel class.
The modelNameOrPath is the model identifier that uniquely identifies the model on Hugging Face. It's a similar concept to package managers versioning. In our case, it's briaai/RMBG-1.4. If you go to the "Files and Versions" Tab, you'll see a list of files including the model weights, configs and other metadata. When you run this script for the first time, TransformersPHP will download the model files to a cache directory and load from there. Subsequent runs will load from the cache only.
However, I don't recommend allowing the first request to trigger this download. Some models can be large so waiting for the download might not be a good user experience. TransformersPHP provides a CLI command to download the model files to your cache directory.
./vendor/bin/transformers download briaai/RMBG-1.4This will download the model files to the cache directory. By default, it's located at [your-project-root]/.transformers-cache.Be sure to exclude the cache directory from your Git repository or .... (well you know). So add .transformers-cache to your .gitignore.
Now that we have our model and processor ready, let's see how we can use them to perform background removal.
background-removal.php
use Codewithkyrian\Transformers\Utils\Image; //... $url = __DIR__.'/woman-with-bag.jpeg'; $image = Image::read($url); ['pixel_values' => $pixelValues] = $processor($image); ['output' => $output] = $model(['input' => $pixelValues]);The Image utility class provides a convenient method to read an image from a URL, amongst other operations that are relevant to image processing. The url can be a local path or a remote URL. This Image utility also allows us to convert images to and from tensors. Check out the documentation for more information.
Here's the image I'm using for this tutorial:

The $processor is an invocable class that takes in the image, performs a couple of operations based on the model's requirements and returns the pixel values. Some of these operations include resizing, normalization, etc. The pixel values are then passed to the model for background removal.
The model instance also is an invocable class and it takes in the pixel values of the input image, performs the background removal and returns the output as a tensor.
For practical purposes, let's dump out the output:
background-removal.php
var_dump($output->toArray());And run the script:
php background-removal.phpBut ohh, we're getting an error!
Fatal error: Uncaught RuntimeException: Image driver not set. Please set the image driver using `Transformers::setup()->setImageDriver()`This is because TransformersPHP needs to know the image driver to use for image processing. TransformersPHP supports 3 image drivers - Imagemagick, GD and VIPS. Most PHP developers are familiar with Imagemagick and GD but not VIPS. We'll get to VIPS later, but for now, choose between Imagemagick and GD, whatever you've installed on your system.
Let's set the image driver (put this at the top):
background-removal.php
use Codewithkyrian\Transformers\Transformers;use Codewithkyrian\Transformers\Utils\ImageDriver; Transformers::setup()->setImageDriver(ImageDriver::IMAGICK);Now run the script again and just be prepared for a loooot of numbers 😜.
Not the most encouraging output but hey, we're getting somewhere. These numbers are not in the form we need them yet. The output of the briaai/RMBG-1.4 model is a tensor that represents a 2D probability distribution over the pixels of the image, with a value between 0 and 1 indicating the probability that a pixel belongs to the foreground (object) or background. Forget the long grammar, the output is a binary mask, where white color represents what we want to keep (foreground) and black color represents what we want to remove (background). (If you've worked with Photoshop or Gimp, you know what a mask is already, forgive me, but not all of us are Photoshop experts).
So, we need to convert this tensor to an image. We'll use the Image utility class again to do this. Remove the var_dump and add the following:
background-removal.php
$mask = Image::fromTensor($output[0]->multiply(255)) ->resize($image->width(), $image->height()); $mask->save(__DIR__.'/mask.png');I'm multiplying the tensor by 255 because the output values are between 0 and 1, but image pixels are typically between 0 and 255, so we need to scale those numbers up. The size of the mask is not actually the same as the original image size because the model was run with a different resolution (Actually, resizing the image to the model's requirements before inference was part of what the processor did for us). If you check the model card, you'll see that the model was trained on 256x256 images, and the output mask is 256x256, so we need to resize the mask to the original image size.
If you run the script now and check your directory, you'll see a mask.png file.

Fear not! This is expected. It's just what I explained early about masks. We just need to apply this mask to the original image to get the foreground. We'll use the Image utility class again to do this.
background-removal.php
$mask = Image::fromTensor($output[0]->multiply(255)) ->resize($image->width(), $image->height()); $maskedImage = $image->applyMask($mask); $maskedImage->save('masked.png');If you check the output image, you'll see your image with a transparent background:

Noiceee! We have ourselves an image with the background removed.
Bringing it all together with Laravel
Now that we've understood the core of it all, let's see how we can integrate it into Laravel. This isn't a Laravel tutorial so I want to assume you already know how to setup a Laravel project. In this tutorial, I'll be using Laravel 11 so you can follow along. We'll create a new Laravel project in another directory.
laravel new background-removal-laravelAnd cd into it:
cd background-removal-laravelWe'll be using Livewire so let's pull that in as well:
composer require livewire/livewireNext we install TransformersPHP:
composer require codewithkyrian/transformersSince we'll be processing images, we need to tell TransformersPHP to use the VIPS driver. The best place to do this is in the boot method of our AppServiceProvider
app/Providers/AppServiceProvider.php
public function boot(){ Transformers::setup()->setImageDriver(ImageDriver::IMAGICK);}Also, just for the sake of tutorial, let's use Livewire Volt to keep things simple:
composer require livewire/voltAnd initialize Volt:
php artisan volt:installAnd for the styling, I'll be using tailwindcss.
npm install -D tailwindcss postcss autoprefixer && npx tailwindcss init -pThen we need to configure our tailwind.config.js
tailwind.config.js
/** @type {import('tailwindcss').Config} */export default { content: [ "./resources/**/*.blade.php", "./resources/**/*.js", "./resources/**/*.vue", ], theme: { extend: {}, }, plugins: [],}And add the following to our app.css
resources/css/app.css
@tailwind base;@tailwind components;@tailwind utilities;Now let's create a new Volt component:
php artisan make:volt homepageAnd add the following to /resources/views/livewire/homepage.blade.php:
resources/views/livewire/homepage.blade.php
<?php use function Livewire\Volt\{state, usesFileUploads}; usesFileUploads(); state(['image']);?> <div class="px-4 py-8"> <h1 class="mb-4 text-center text-4xl font-bold text-indigo-900">TransformersPHP Background Removal Tool</h1> <p class="mb-8 text-center text-lg">Upload an image to remove the background.</p> <div class="mb-8 flex items-center justify-center w-full max-w-2xl mx-auto"> <label for="dropzone-file" class="flex flex-col items-center justify-center w-full aspect-video border-2 border-gray-300 border-dashed rounded-lg cursor-pointer bg-gray-200 hover:bg-gray-100"> <div class="flex flex-col items-center justify-center pt-5 pb-6"> <svg class="w-8 h-8 mb-4 text-gray-500" aria-hidden="true" xmlns="http://www.w3.org/2000/svg" fill="none" viewBox="0 0 20 16"> <path stroke="currentColor" stroke-linecap="round" stroke-linejoin="round" stroke-width="2" d="M13 13h3a3 3 0 0 0 0-6h-.025A5.56 5.56 0 0 0 16 6.5 5.5 5.5 0 0 0 5.207 5.021C5.137 5.017 5.071 5 5 5a4 4 0 0 0 0 8h2.167M10 15V6m0 0L8 8m2-2 2 2"/> </svg> <p class="mb-2 text-sm text-gray-500"><span class="font-semibold">Click to upload</span> or drag and drop</p> <p class="text-xs text-gray-500">SVG, PNG, JPG or GIF (MAX. 800x400px)</p> </div> <input id="dropzone-file" type="file" class="hidden" wire:model="image"/> </label> </div></div>This is a simple image upload form with the input wired up to the image property of the volt component. Livewire Volt supports full page components so let's use that:
routes/web.php
use Livewire\Volt\Volt; Volt::route('/', 'homepage')->name('homepage');When using full page Volt components, Livewire requires we have a components.layouts.app layout file. Let's create that:
resources/components/layouts/app.blade.php
<!DOCTYPE html><html lang="{{ str_replace('_', '-', app()->getLocale()) }}"><head> <meta charset="utf-8"> <meta name="viewport" content="width=device-width, initial-scale=1"> <title>TransformersPHP Background Removal</title> <!-- Fonts --> <link rel="preconnect" href="https://fonts.bunny.net"> <link href="https://fonts.bunny.net/css?family=figtree:400,600&display=swap" rel="stylesheet"/> <!-- Styles --> @vite(['resources/css/app.css', 'resources/js/app.js'])</head><body class="bg-gray-100"><div class="min-h-screen container mx-auto flex items-center justify-center flex-col"> {{ $slot }}</div></body></html>Let's start the dev server:
php artisan serveAnd the frontend:
npm run devNow when we navigate to /, we should see our homepage component.
Next, let's wire up an action to handle the image upload. I want the processing to start immediately an image is selected, no need to press the upload button or anything. So we'll use livewire lifecyle hook, updated{property} to listen to when the image property has been updated:
resources/views/livewire/homepage.blade.php
$updatedImage = function () { $name = pathinfo($this->image->getClientOriginalName(), PATHINFO_FILENAME); $extension = $this->image->getClientOriginalExtension(); $uploadName = $name.'_'.time().'.'.$extension; $uploadPath = $this->image->storeAs('images', $uploadName, 'public'); $imageId = base64url_encode($uploadPath);};I'm not doing any validation here for simplicity but in production, you'd definitely want to have that. I'm getting the image original name, generating a unique name by appending the current timestamp and then storing it in the public/images directory.
Don't forget to run:
php artisan storage:linkto properly serve the public storage.
base64url_encode is not an inbuilt function in PHP, but before we define our own, let's find out why I'm using it in the first place.
In a production environment, you need a unique way to identify the image later - in job processing, for accessing the image's result page multiple times, etc. One way to do it is to associate the uploaded image with a database model using something like Laravel Media Library. But I want to keep things simple, so we compute a unique identifier for our uploaded images using the path of the image, this way, I can pass it around in jobs, url, etc and decode the thing to get back the image path. Sleek!
So let's define the function in a custom Helpers.php file:
app/Helpers.php
<?php if (!function_exists('base64url_encode')) { function base64url_encode(string $data): string { return rtrim(strtr(base64_encode($data), '+/', '-_'), '='); }} if (!function_exists('base64url_decode')) { function base64url_decode(string $data): string { return base64_decode(str_pad(strtr($data, '-_', '+/'), strlen($data) % 4, '=')); }}And don't forget to add the helper file to autoload:
composer.json
"autoload": { "files": [ "app/Helpers.php" ]}Then call composer dump-autoload to autoload the helper file.
composer dump-autoloadNow let's take a moment and walk through what we want to happen after uploading an image. After upload, we want to:
- Dispatch a job to start processing the image in the background.
- Redirect the user to a page that will show the result.
- Show the user that the processing is ongoing.
- Fire an event from our job when the processing is complete.
- Listen for that event in our frontend and show the result to the user.
It's straightforward so let's go through that one step at a time.
Create a new job:
php artisan make:job RemoveImageBackgroundThis is where we'll put the code to process the image.
App/Jobs/RemoveImageBackground
<?php namespace App\Jobs; use Illuminate\Contracts\Queue\ShouldQueue;use Illuminate\Foundation\Bus\Dispatchable;use Illuminate\Foundation\Queue\Queueable;use Illuminate\Queue\InteractsWithQueue;use Illuminate\Queue\SerializesModels; class RemoveImageBackground implements ShouldQueue{ use Queueable; protected string $modelName = 'briaai/RMBG-1.4'; /** * Create a new job instance. */ public function __construct(public string $id) { // } /** * Execute the job. */ public function handle(): void { }}Not much changes from the default job class. I just implemented ShouldQueue to allow the job to be queued and added the $id property to the constructor. This
$id is the unique identifier we generated for the image. I also defined the model name as a property so we can easily change it if needed.
Now let's implement the handle method.
App/Jobs/RemoveImageBackground
/** * Execute the job. */public function handle(): void{ $path = base64url_decode($this->id); $url = Storage::disk('public')->path($path); $model = AutoModel::fromPretrained($this->modelName); $processor = AutoProcessor::fromPretrained($this->modelName); $image = Image::read($url); ['pixel_values' => $pixelValues] = $processor($image); ['output' => $output] = $model(['input' => $pixelValues]); $mask = Image::fromTensor($output[0]->multiply(255)) ->resize($image->width(), $image->height()); $maskedName = pathinfo($path, PATHINFO_FILENAME).'_masked'; $maskedPath = "images/$maskedName.png"; $maskedImage = $image->applyMask($mask); $maskedImage->save(Storage::disk('public')->path($maskedPath));}There isn't much difference from the code we wrote earlier. The original path was gotten by decoding the id, and after getting our masked image, I appended "_masked" to the original name and saved it back to storage, before getting a new id for the masked image.
Let's download the model we'll be using as a good measure. I don't want the download to happen in the background job because it'll be too slow, and the job will definitely timeout.
./vendor/bin/transformers download briaai/RMBG-1.4Now let's go back to our homepage and dispatch this job:
resources/views/livewire/homepage.blade.php
$updatedImage = function () { //... $imageId = base64url_encode($uploadPath); RemoveImageBackground::dispatch($imageId); $this->redirectRoute('results', ['id' => $imageId]);};We don't have a results route or component yet, so let's create that.
php artisan make:volt resultsAnd add the following to results.blade.php:
resources/views/livewire/results.blade.php
<?php use function Livewire\Volt\{mount, state}; state(['id', 'imageUrl', 'maskedImageUrl']); mount(function ($id) { $this->id = $id; $path = base64url_decode($id); abort_if(!Storage::disk('public')->exists($path), 404); $this->imageUrl = Storage::url($path);}); ?> <div class="px-4 py-8"> <h1 class="mb-8 text-center text-4xl font-bold text-indigo-900">TransformersPHP Background Removal Tool</h1> <div class="mb-8 relative flex items-center justify-center w-full"> @if($maskedImageUrl) <div id="image-compare" class="relative h-[32rem]"> <img id="masked-image" src="{{ asset($maskedImageUrl) }}" alt="Uploaded image" class="h-full w-auto"> <img src="{{ asset($imageUrl) }}" alt="Uploaded image" class="h-full w-auto"> </div> @else <div class="relative h-[32rem]"> <img src="{{ asset($imageUrl) }}" alt="Uploaded image" class="h-full w-auto"> <div class="absolute inset-0 flex items-center justify-center backdrop-blur-sm"> <img src="{{asset('img/ai-loading.gif')}}" alt="loading..." class="h-24 w-24"> </div> </div> @endif </div></div>Nothing new here. If the masked image is not available, we show the image blurred with a loading indicator, else, we show the both images. Here's the loading indicator in case you're following along:

And now let's add the route for it:
routes/web.php
Volt::route('/results/{id}', 'results')->name('results');Let's summarize what we've done so far:
- We created a Laravel project and integrated Livewire and Volt.
- We created a simple image upload form and a results page.
- We created a job to perform background removal using TransformersPHP.
- We dispatched the job from the homepage component and listened for the result in the results component using Livewire's event system.
Before we test our app, we must start the queue worker(s). If you're using the database queue driver, the migration for the jobs table has already been added so you can go ahead and startup your queue worker(s):
php artisan queue:workNow if you navigate to / and test your application with an image.
Image Processing and Memory Limit
For most of you, if you check back the queue, you may find it has failed and some error like this:
Allowed memory size of XXXXXXXXX bytes exhausted (tried to allocate XXXXXXXX bytes)Remember earlier when I talked about the 3 drivers for image processing and hinted about VIPS driver being memory efficient? Well, it's time to talk about it.
Depending on your memory limit (check by running php -i | grep memory_limit), you might or might not hit the limit if you try to process large images. The Imagemagick and GD drivers are good, each with their own tradeoffs. For example, GD is faster and more memory efficient than Imagemagick, but Imagemagick has better support for some image formats and more accurate. However, when it comes to speed and memory efficiency, VIPS driver knocks them both out of the park. I know I'm supposed to be impartial but I'm really feeling this library.
Anyway, let's update our application to use the VIPS driver.
app/Providers/AppServiceProvider
public function boot(){ Transformers::setup()->setImageDriver(ImageDriver::VIPS);}Of course, for a much larger image, say 4000x4000 (you shouldn't allow your users to upload images larger than 4 megapixels in practice), you'd still hit the limit so you'll have to increase your memory limit to accommodate.
Now restart your queue worker(s) and re-run the application (the job will try to start again but fail since it has no retries). Just try things out again and you'll see that the app doesn't crash anymore.
However, the frontend keeps loading till thy kingdom come because there's no way for our application to know when the job is done. We need to notify the application through a websocket connection that the job is done and the result is ready.
Real-Time Updates with Laravel Reverb
Laravel makes working with websockets super easy, thanks to Laravel Reverb. Livewire takes it a step further and makes it super easy to handle these events on the client. First, let's install reverb:
php artisan install:broadcastingNow let's create an event that will be fired from our job when it's done:
php artisan make:event ImageBackgroundRemovedAnd add the following to the event:
App/Events/ImageBackgroundRemoved
<?php namespace App\Events; use Illuminate\Broadcasting\Channel;use Illuminate\Broadcasting\InteractsWithSockets;use Illuminate\Broadcasting\PresenceChannel;use Illuminate\Broadcasting\PrivateChannel;use Illuminate\Contracts\Broadcasting\ShouldBroadcast;use Illuminate\Foundation\Events\Dispatchable;use Illuminate\Queue\SerializesModels; class ImageBackgroundRemoved implements ShouldBroadcast{ use Dispatchable, InteractsWithSockets, SerializesModels; /** * Create a new event instance. */ public function __construct(protected string $id, public string $masked_id) { // } /** * Get the channels the event should broadcast on. * * @return array<int, \Illuminate\Broadcasting\Channel> */ public function broadcastOn(): array { return [ new Channel($this->id), ]; }}The event constructor takes the id of the image and the masked id. We'll use the id to identify the channel and the masked id to pass the result back to the client.
Remember, the
$idis protected so it won't be part of the payload sent to the client.
Now let's fire the event from our job:
App/Jobs/RemoveImageBackground
public function handle(): void{ //... $maskedId = base64url_encode($maskedPath); ImageBackgroundRemoved::dispatch($this->id, $maskedId);}Now let's listen for the event in our results component. Livewire has already setup everything you need - Laravel Echo et al. Livewire Volt also provides the on method to listen to events:
resources/views/livewire/results.blade.php
use function Livewire\Volt\{mount, state, on}; //... on(['echo:{id},ImageBackgroundRemoved' => function ($payload) { $path = base64url_decode($payload['masked_id']); $this->maskedImageUrl = Storage::url($path); }]);The convention for the channel name is echo:{channel_name},{event_name}. In our case, the channel name is the id of the image and the event name is ImageBackgroundRemoved.
Now let's start our Reverb server:
php artisan reverb:startAlso restart the queue worker just to be safe. Or just use
php artisan queue:listenso it gracefully restarts when your app changes.
Visiting the homepage and uploading an image, you should see the loading indicator on the results page. After a few seconds, the image should be processed and the result shown. Noice!!!!
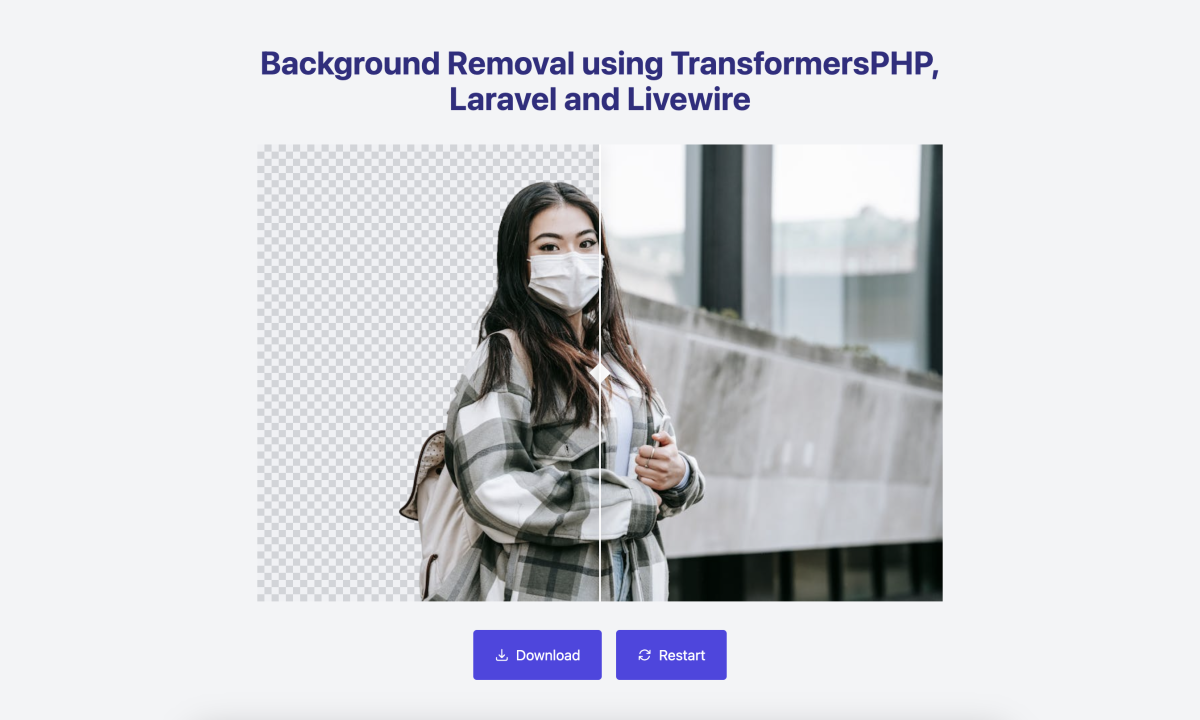
Adding an Image Comparator
But why stop there? In the demo video I posted, there was an image comparator with a handle that allowed us to switch between the original and the masked image. Let's add that.
First, let's install a javascript library that will help us with image comparison.
npm install image-compare-viewerThen add the css:
resources/css/app.css
@import "../../node_modules/image-compare-viewer/dist/image-compare-viewer.min.css"; @tailwind base;@tailwind components;@tailwind utilities;And we import it in app.js:
resources/js/app.js
import './bootstrap'; import ImageCompare from "image-compare-viewer"; window.ImageCompare = ImageCompare;And while we're at it, let's install a tailwind plugin for background patterns (the checkerboard pattern in the background).
npm install tailwindcss-bg-patternsAnd add it to the tailwind.config.js:
tailwind.config.js
plugins: [ require('tailwindcss-bg-patterns'),],Let's update our results.blade.php to include the image comparator:
resources/views/livewire/results.blade.php
<div class="px-4 py-8"> //... @if($maskedImageUrl) <div id="image-compare" class="relative h-[32rem]"> <img id="masked-image" src="{{ asset($maskedImageUrl) }}" alt="Masked image" class="h-full w-auto"> <img id="original-image" src="{{ asset($imageUrl) }}" alt="Uploaded image" class="h-full w-auto"> <div class="absolute inset-0 keep z-[-1] pattern-rectangles pattern-gray-600 pattern-size-4 pattern-opacity-20 pattern-bg-gray-200"></div> </div> @else //... @endif</div> @script<script> Livewire.hook('morph.added', ({el}) => { if (el.id !== 'image-compare') return; initImageCompare(); }) function initImageCompare() { const image_compare = document.getElementById('image-compare'); if (!image_compare) return; const options = { showLabels: true, labelOptions: { before: 'Masked', after: 'Original', onHover: true }, } new ImageCompare(image_compare, options).mount(); } initImageCompare();</script>@endscriptI'm not going to explain the code above because it's pretty self explanatory. It's just a javascript library that allows us to compare two images. You can check the documentation for more information.
If you test the application now, it feels and looks much cleaner and presentable.
Optimizing for Page Refreshes
If you're observant however, you'd notice that if you refresh the results page, the app goes into loading mode, waiting to be notified about the complete job before re-rendering with the masked image. But then, the job may have finished so the app waits perpetually for a notification that will never happen. It would be nice to have a way to check if there is an existing result for the image and render it directly, if not, then we can keep waiting for the notification.
If we associated our image with a database, then it's as simple as saving the path to the resultant masked image in the database and checking if it exists when the page is refreshed. But in our case, we don't have a database, but we can use a cache to store the masked id, with the key being the original image id.
Let's update our RemoveImageBackground job to store the masked id in the cache:
app/Jobs/RemoveImageBackground
public function handle(): void{ ... $maskedId = base64url_encode($maskedPath); Cache::put($this->id, $maskedId, now()->addMinutes(60)); ImageBackgroundRemoved::dispatch($this->id, $maskedId);}And then in our results.blade.php component, let's check if the masked id is in the cache, and set the masked image url accordingly:
resources/views/livewire/results.blade.php
mount(function ($id) { $this->id = $id; $path = base64url_decode($id); abort_if(!Storage::disk('public')->exists($path), 404); $this->imageUrl = Storage::url($path); if (Cache::has($id)) { $path = base64url_decode(Cache::get($id)); $this->maskedImageUrl = Storage::url($path); }});Again, remember to restart your workers if you're still using
queue:work. I can't tell you how many times I forgot to do that when testing.
Now if you try again, and refresh the results page after the initial re-render, it should render the masked image directly if it exists in the cache, and the cache expires after 60 minutes.
You can also clean up the uploaded and masked images that have expired using a scheduled task, but I'll leave that as an exercise for you.
Adding a Download Button
Let's add a download button and another button to restart the background removal process in the results page.
resources/views/livewire/results.blade.php
<div class="mb-8 relative flex items-center justify-center w-full"> ....</div><div class="px-4 flex justify-center"> <button class="px-6 py-4 mx-2 rounded bg-indigo-600 text-white hover:bg-indigo-700 inline-flex items-center" wire:click="download"> <svg class="size-4 me-2" xmlns="http://www.w3.org/2000/svg" fill="none" viewBox="0 0 24 24" stroke-width="2" stroke="currentColor"> <path stroke-linecap="round" stroke-linejoin="round" d="M3 16.5v2.25A2.25 2.25 0 0 0 5.25 21h13.5A2.25 2.25 0 0 0 21 18.75V16.5M16.5 12 12 16.5m0 0L7.5 12m4.5 4.5V3"/> </svg> Download </button> <button class="px-6 py-4 mx-2 rounded bg-indigo-600 text-white hover:bg-indigo-700 inline-flex items-center" wire:click="remove"> <svg class="size-4 me-2" xmlns="http://www.w3.org/2000/svg" fill="none" viewBox="0 0 24 24" stroke-width="2" stroke="currentColor"> <path stroke-linecap="round" stroke-linejoin="round" d="M16.023 9.348h4.992v-.001M2.985 19.644v-4.992m0 0h4.992m-4.993 0 3.181 3.183a8.25 8.25 0 0 0 13.803-3.7M4.031 9.865a8.25 8.25 0 0 1 13.803-3.7l3.181 3.182m0-4.991v4.99"/> </svg> Restart </button></div>And let's add the methods at the top:
resources/views/livewire/results.blade.php
use function Livewire\Volt\{action, mount, state, on}; //... $download = action(fn () => response()->download(public_path($this->maskedImageUrl))) ->renderless(); $remove = fn () => $this->redirectRoute('homepage');And that's it!
Conclusion
And there you have it. We've built a background removal tool using Laravel, Livewire, Volt, and TransformersPHP. We also briefly touched on using Laravel Cache and Broadcasting to handle the result rendering and processing.
I hope you enjoyed the tutorial and learned something from it. Here's the repo for the complete application: codewithkyrian/transformersphp-background-removal. If you have any questions, please feel free to reach out to me on Twitter/X @codewithkyrian. Also don't forget to leave a star for TransformersPHP if you found it useful, it really helps!
Daalụ. Ka emesia!
0 Comments
No comments yet. Be the first to comment!
Would you like to say something? Please log in to join the discussion.
Login with GitHub